Thinking of Multidimensional Arrays as Rows and Columns
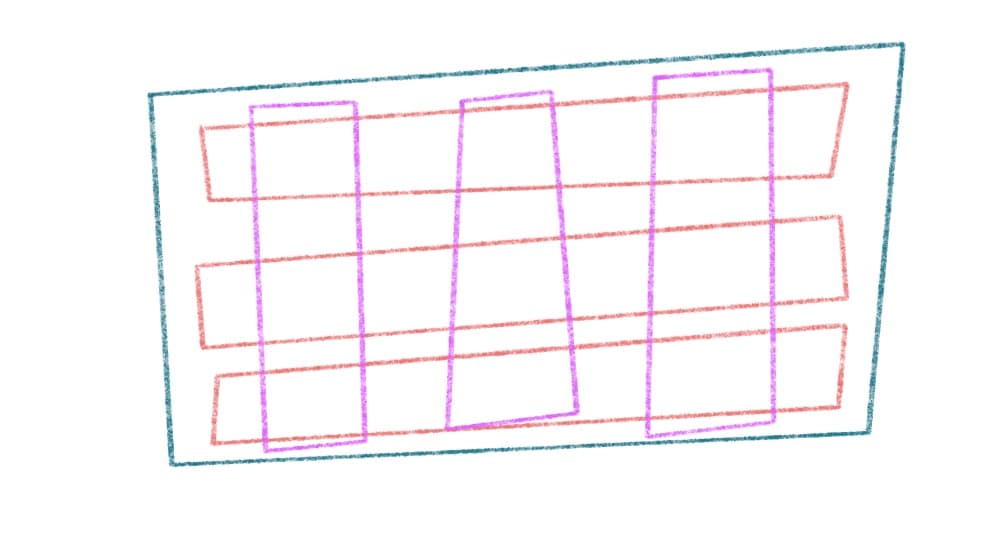
In doing some leetcode/algorithm practice, I've come across a series of interesting challenges that involve multidimensional or nested array structures. These problems involve modeling the array a structure that contains columns and rows. Solutions for these challenges are interesting enough that I thought they merited a blog post. They've changed the way I think about these types of problems and made them significantly less scary.
I want to credit Stephen Grider and his excellent "The Coding Interview Bootcamp: Algorithms and Data Structures course for helping me to think about these problems in a much saner way. The solutions presented here are very similar to his, and I think exactly what he posts in the Matrix Spiral example.
The "Step" Problem
Challenge:
// --- Directions
// Write a function that accepts a positive number N.
// The function should console log a step shape
// with N levels using the # character.  Make sure the
// step has spaces on the right hand side!
// --- Examples
//   steps(2)
//       '# '
//       '##'
//   steps(3)
//       '#  '
//       '## '
//       '###'
//   steps(4)
//       '#   '
//       '##  '
//       '### '
//       '####'
This is a nice introduction to the concept of moving through nested arrays with rows and columns. A couple of things to point out off the bat:
- There is no need to return a full structure here. We can just log each row (yay!)
- The amount of rows and columns will always be the same (also yay!)
So how can we think about the structure we are moving through here? In the below drawing, I've highlighted the rows and columns in the structure:
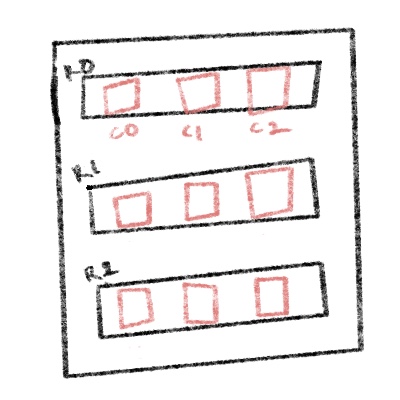 We can keep that drawing in mind while we start coding a solution.
function steps(n) {
  // Loop the "rows"
  for (let row = 0; row<n; row++) {
  	// do something...?
  }
}
Initially, we are setting up a for loop. Because of the nature of nested arrays, this initial loop will simply move through each inner array. We can think of these inner arrays as columns. If we pass 3 to our function, we want to loop over 3 columns.
But how can we access the rows?
This is where a nested loop comes into play. Our nested loop will move through each column in the current row.
function steps(n) {
  // Loop the "rows"
  for (let row = 0; row < n; row++) {
  	// access the individual columns with another loop
    for (let column = 0; column < n; column++) {
      // Now we are inside each indivdual column!
      console.log(`hello from row ${row}, column ${column}`)
    }
  }
}
If you run the above code, you'll see a log for each "square" of our overall structure from the problem statement.
If this isn't making sense, I would take a piece of paper and write this out and marinate on it. The above concept is crucial for any of the forthcoming logic or problems.
Assuming this makes sense, let's move on to the work we need to do here. We want to log a string for each row, so let's get a string ready and log it at the appropriate time:
function steps(n) {
  // Loop the "rows"
  for (let row = 0; row < n; row++) {
  	// access the individual columns with another loop

    // create a string to manipulate
    let str = "";
    for (let column = 0; column < n; column++) {
      // Now we are inside each indivdual column!

      // Ok what work do we need to do?
    }

    // log it every time we finish building a row


    console.log(str)
  }
}
The last step here is to determine which columns in a given row are given a #. We can think of that as a relationship between the current column and the current row. We know that for the first row, only the first column gets a #. And for each successive row, we add one more. We can express that like:
if (column > row) {
  string+= " ";
} else {
  string+= "#";
}
Using the previous drawing, we can visualize how this should be built out:
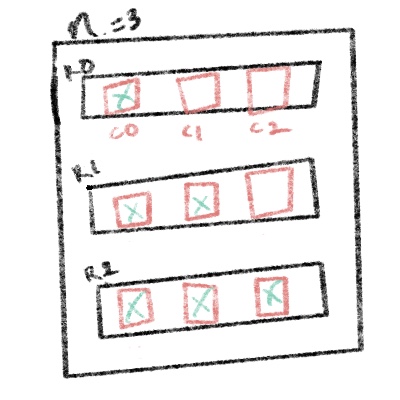
Add that condition in, and the final code looks like this, and should work:
function steps(n) {
  for (let row = 0; row < n; row++) {
    let str = ""
    for (let column = 0; column < n; column++) {
      if (column > row) {
        str += " "
      } else {
        str += "#"
      }
    }
    console.log(str)
  }
}
The "Pyramid" Problem
Challenge:
// --- Directions
// Write a function that accepts a positive number N.
// The function should console log a pyramid shape
// with N levels using the # character.  Make sure the
// pyramid has spaces on both the left *and* right hand sides
// --- Examples
//   pyramid(1)
//       '#'
//   pyramid(2)
//       ' # '
//       '###'
//   pyramid(3)
//       '  #  '
//       ' ### '
//       '#####'
This problem is a good next step if the concepts from the first challenge are starting to feel more solid. The problem statement is similar, but now we need to account for steps from "both sides" resulting in a pyramid structure.
Let's set up our basic implementation. We know that we will once again be dealing with columns and rows.
function pyramid(n) {
  //loop each row
  for (let row = 0; row < n; row++) {
    let str = "";
    // loop each column
    for (let column = 0; column < ???)
  }
}
Pretty quickly, we realize that the number of columns involved in the problem isn't as easily derived as it was in the first example. However, there is a constant formula we can use to figure this out: 2 * n - 1. Remember your order of operations here as you think through this! A pyramid of 2 rows will have 3 columns. 3 rows will have 5 columns.
Let's add that to our code:
function pyramid(n) {
  const numColumns = 2 * n - 1;
  //loop each row
  for (let row = 0; row < n; row++) {
    let str = "";
    // loop each column
    for (let column = 0; column < numColumns; column ++) {
      // Figure out when we need a `#`
    }
  }
}
With the information we have thus far, let's draw a pyramid with 3 rows:
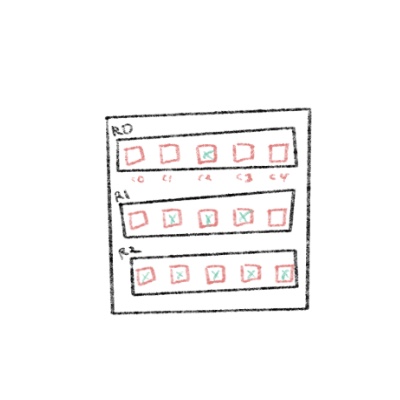
This fits our criteria as defined in the function. 3 rows and 5 columns.
Now we know that we've got some work to do - we need to determine where to add our # symbols. In looking at the drawing above, there is a clear midpoint in the pyramid. We first need a way to mathematically determine which column should be considered the midpoint. We can do that with the below formula:
Math.floor(numColumns /2)
This value is also a constant throughout the function, so let's add it:
function pyramid(n) {
  const numColumns = 2 * n - 1;
  const midPointIndex = Math.floor(numColumns / 2);
  //loop each row
  for (let row = 0; row < n; row++) {
    let str = "";
    // loop each column
    for (let column = 0; column < numColumns; column ++) {
      // Figure out when we need a `#`
    }
  }
}
With the midpoint value established, let's take another look at our drawing and try to understand the relationship between rows, columns and the midpoint:
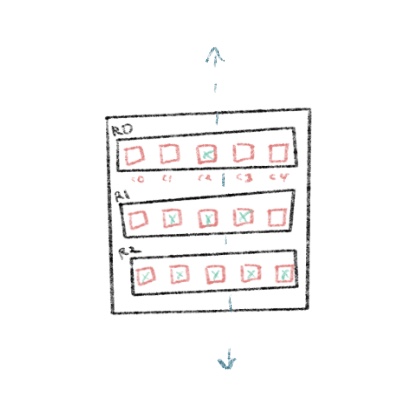
There's a relationship here. As we move down the rows, we can see that the blocks are inserted into the columns within a given range. It's the midpoint plus the row index on one side, and the midpoint minus the row index on the other.
Now it's 2024, and for some unknown reason, Javascript still does not have an official method to generate a simple range of numbers. Insane. Anyway, here is one way to do it from MDN.
const range = (start, stop, step) =>
  Array.from({ length: (stop - start) / step + 1 }, (_, i) => start + i * step);
With that helper available to us, we can establish a range from the relationship between midpoint, row and column, and then check if a given column falls within the range. With that included, the final implementation looks like this:
function pyramid(n) {
  const getRange = (start, stop, step) =>
    Array.from({
      length: (stop - start) / step + 1
    }, (_, i) => start + i * step);
  const numColumns = 2 * n - 1;
  const midPointIndex = Math.floor(numColumns / 2);
  // loop over total number of rows
  for (let row = 0; row < n; row++) {
    let level = ""
    // inside each row, loop the columns;
    for (let column = 0; column < numColumns; column++) {
      // generate a range from our bounds
      const range = getRange(midPointIndex - row, midPointIndex + row, 1)
      // check if a given column falls in that range
      const canAddBlock = range.includes(column)
      if (canAddBlock) {
        level += "#";
      } else {
        level += " ";
      }
    }
    console.log(level)

  }
}
The Spiral Problem
Challenge:
// --- Directions
// Write a function that accepts an integer N
// and returns a NxN spiral matrix.
// --- Examples
//   matrix(2)
//     [[1, 2],
//     [4, 3]]
//   matrix(3)
//     [[1, 2, 3],
//     [8, 9, 4],
//     [7, 6, 5]]
//  matrix(4)
//     [[1,   2,  3, 4],
//     [12, 13, 14, 5],
//     [11, 16, 15, 6],
//     [10,  9,  8, 7]]
This one is a doozy. The "spiral" nature of this problem can be seen upon closer inspection of the structure. The program should increment in a spiral fashion as traced in the picture below:
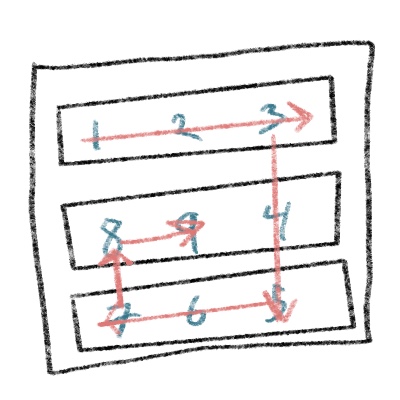
Our task will be to programatically guide this spiral.
As before, we will be using rows and columns here. But we will be expanding on the pattern a bit to add the concept of constraints - the beginning and the end rows and columns for a given operation. This will allow us to use the constraints to narrow down the path or bounds of the loops we can expect to write.
We can think of a strategy in which we use these constraints to guide the program through the spiral.
I will start coding a solution and updating the drawing to make more sense of this.
function matrix(n) {
  // create our final structure... an array containing n subarrays
  const final = []

  for (let i = 0; i <= n; i++) {
    final.push([])
  }
  // the challenge has us counting from 1
  let counter = 1;

  // create our bounds or constraints
  let startRow = 0;
  let endRow = n - 1;
  let startColumn = 0;
  let endColumn = n - 1;

  // do something
}
Above is the basic set up of the values we will need to solve this problem. We have a final data structure to assign to, and we have established the start and end rows and columns to let us establish the bounds to guide the loop along.
Now we can think of the conditions we need to establish to keep a loop running. Essentially, we want to keep looping as long as the bounds we've established don't overrun each other. We can express that like this:
while (startColumn <= endColumn && startRow <= endRow) {
  // do something
}
And thus begins our logic. If we refer back to the drawing, we can focus in on the beginning of the spiral. It iterates across the first row:
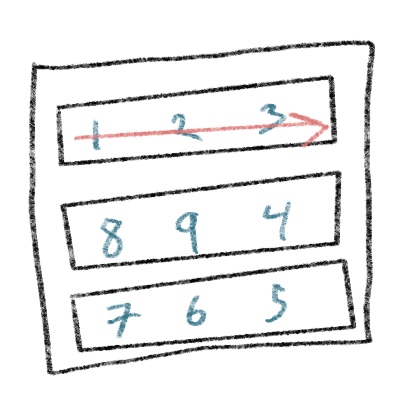
We need to write a loop that says "Loop from the first to the last column in the first row and incrementally add values". That would look like this:
for (let i = startColumn; i <= endColumn; i++) {
  final[startRow][i] = counter;
  counter++
}
And looking back at the above drawing, we can see that the first row has been taken care of, we don't need to revisit it. Hence, we can increment the startRow value in code.
  for (let i = startColumn; i<= endColumn; i++) {
    final[startRow][i] = counter;
    counter++
  }
  startRow++
For now, our program looks like this:
function matrix(n) {
  // create our final structure... an array containing n subarrays
  const final = []

  for (let i = 0; i <= n; i++) {
    final.push([])
  }
  // the challenge has us counting from 1
  let counter = 1;

  // create our bounds or constraints
  let startRow = 0;
  let endRow = n - 1;
  let startColumn = 0;
  let endColumn = n - 1;

  while (startColumn <= endColumn && startRow <= endRow) {
    // do something
    // loop the top row from start to end column
    for (let i = startColumn; i<= endColumn; i++) {
      final[startRow][i] = counter;
      counter++
    }
    startRow++
  }
}
Let's look at another drawing that lays out what we need to do next:
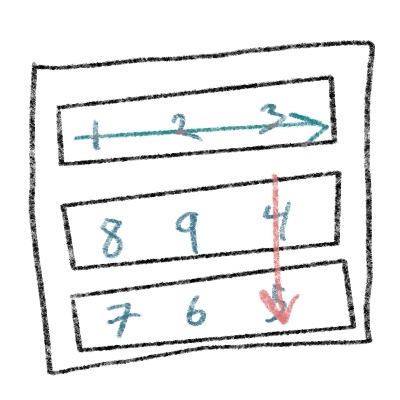
We need to move from the start row to the end row, incrementing in the end column. Because we incremented the start row already, this means the value of startRow is now 1.
  for (let i = startRow; i <= endRow; i++) {
    final[i][endColumn] = counter
    counter++
  }
  endColumn--
Looking at the drawing again, we can see that the endColumn has been taken care of. We can decrement that value and work on our next piece of the spiral:
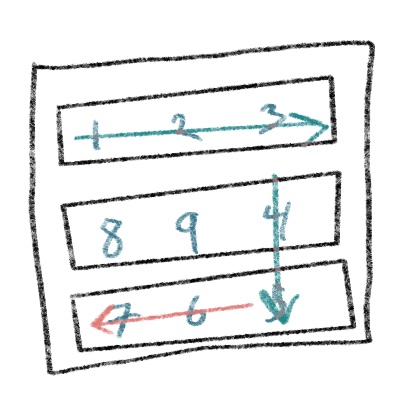
We need to move backwards from the endColumn to the startColumn in the endRow
  for (let i = endColumn; i >= startColumn; i--) {
    final[endRow][i] = counter;
    counter++
  }
  endRow--
And because the last row is now taken care of, we can decrement the value of endRow as well.
Finally, we need to take care of the value between the bounds of the end and start rows at the current startColumn:
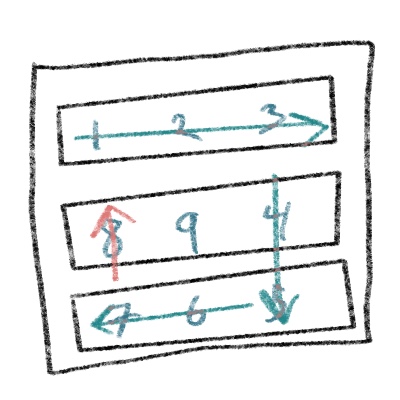
  for (let i = endRow; i >= startRow; i--) {
    final[i][startColumn] = counter;
    counter++
  }

  startColumn++
This will start the entire while loop again, but the constraints have changed. The final number will get picked up. The complete final code looks like:
function matrix(n) {
  // create our final structure... an array containing n subarrays
  const final = []

  for (let i = 0; i < n; i++) {
    final.push([])
  }
  // the challenge has us counting from 1
  let counter = 1;

  // create our bounds or constraints
  let startRow = 0;
  let endRow = n - 1;
  let startColumn = 0;
  let endColumn = n - 1;

  while (startColumn <= endColumn && startRow <= endRow) {
    // do something
    // loop the top row from start to end column
    for (let i = startColumn; i <= endColumn; i++) {
      final[startRow][i] = counter;
      counter++
    }
    startRow++

    for (let i = startRow; i <= endRow; i++) {
      final[i][endColumn] = counter
      counter++
    }
    endColumn--

    for (let i = endColumn; i >= startColumn; i--) {
      final[endRow][i] = counter;
      counter++
    }
    endRow--

    for (let i = endRow; i >= startRow; i--) {
      final[i][startColumn] = counter;
      counter++
    }

    startColumn++
  }

  console.log(final)
}
The above problem can take a while to wrap your head around. However, the concept of using bounds to guide loops has wide applications. Think of a Sudoku game, for example.
Parting Thoughts
I don't think any of the above three examples are particularly simple problems. They require you to model data in a way that might not be completely natural or instinctive. Once you've become comfortable with these patterns, however, the basic concepts of rows and columns can be applied to all kinds of challenges.